我们可以发现,现在的app对圆形图片的使用越来越普遍,特别是用户的头像等。圆形图片外观柔和、友好、饱满,能大大提升用户的视觉体验。所以今天我们就来看看怎样自定义圆形的ImageView(一些说明与应该注意的点就写在注释里了)。
①首先我们要自定义该CustomImageView的属性:在values目录下创建一个attrs.xml文件,声明自定义ImageView可以设置哪些属性。
<?xml version="1.0" encoding="utf-8"?><resources><declare-styleable name="CustomImageView"><!--这是一个设置原图片的属性--><attr name="src" format="reference"/></declare-styleable></resources>
②下面CustomImageView在xml布局文件中的使用,别忘了加自己的命名空间(xmlns:app="/apk/res-auto")
<?xml version="1.0" encoding="utf-8"?><LinearLayout xmlns:android="/apk/res/android"xmlns:app="/apk/res-auto"xmlns:tools="/tools"android:layout_width="match_parent"android:layout_height="match_parent"android:background="@color/bottomTabStart"android:gravity="center"android:orientation="vertical"tools:context=".activtiy.MainActivity"><com.tangao.test.view.CustomImageViewandroid:layout_width="wrap_content"android:layout_height="wrap_content"app:src="@drawable/panda" /></LinearLayout>
③当然,我们还需要用代码来实现这个自定义的ImageView(这才是最主要的)。
public class CustomImageView extends View {// 图片private Bitmap mSrc;// 控件的宽度private int mWidth;// 控件的高度private int mHeight;/*** 把自定义的这个CustomImageView放到布局文件中并设置属性,资源解析器就会进入这个构造方法,对资源进行解析** @param context* @param attrs*/public CustomImageView(Context context, AttributeSet attrs)// 由资源解析程序使用{this(context, attrs, 0);}public CustomImageView(Context context)// 由代码使用{this(context, null);}/*** 初始化一些自定义的参数** @param context* @param attrs* @param defStyle*/public CustomImageView(Context context, AttributeSet attrs, int defStyle) {super(context, attrs, defStyle);// 属性(id)数组TypedArray a = context.obtainStyledAttributes(attrs,R.styleable.CustomImageView, defStyle, 0);//a.getIndexCount();// 获取布局文件中CustomImageView设置的属性个数//a.getIndex(i);// 返回xml中CustomImageView设置了的各属性的 “属性名”(就是attrs.xml中的部分或全部属性),取值0,1,2...// if (a.getIndexCount() == 0) {// try {//throw new Exception("自定义ImageView未设置图片资源");// } catch (Exception e) {//e.printStackTrace();// } finally {//Log.i("CustomImageViewError", "自定义ImageView未设置图片资源");// }// }//根据属性名,获取到对应的图片ID,再将id对应的drawable图片转成位图mSrc = BitmapFactory.decodeResource(getResources(),a.getResourceId(R.styleable.CustomImageView_src, 0));a.recycle();// 记得最后要recycle掉}/*** 计算控件的高度和宽度,最后重置宽高度*/@Overrideprotected void onMeasure(int widthMeasureSpec, int heightMeasureSpec) {// super.onMeasure(widthMeasureSpec, heightMeasureSpec);/*** 设置宽度*/int specMode = MeasureSpec.getMode(widthMeasureSpec);//MeasureSpec是一个用static修饰的内部类,因此可以当做一个普通的类来使用/*** 当customImageView设置成match_parent或具体值时,那就是 屏幕的宽高度 或 具体值* 当customImageView设置成wrap_content时,specsize为customImageView的最大宽高度(决定于父控件宽高度)*/int specSize = MeasureSpec.getSize(widthMeasureSpec);if (specMode == MeasureSpec.EXACTLY)// xml中customImageView中设置的match_parent , accurate(确定的值){mWidth = specSize;} else {// 由图片决定的宽,padding是xml中customImageView中设置的paddingint desireByImg = getPaddingLeft() + getPaddingRight() + mSrc.getWidth();if (specMode == MeasureSpec.AT_MOST)// wrap_content{/*** 当某些图片较大时,使用wrap_content可能超出屏幕,此时 specSize < desireByImg* 当某些图片较小时,没超出屏幕,此时 specSize > desireByImg*/mWidth = Math.min(desireByImg, specSize);}}/**** 设置高度*/specMode = MeasureSpec.getMode(heightMeasureSpec);specSize = MeasureSpec.getSize(heightMeasureSpec);if (specMode == MeasureSpec.EXACTLY)// match_parent , accurate{mHeight = specSize;} else {int desire = getPaddingTop() + getPaddingBottom() + mSrc.getHeight();if (specMode == MeasureSpec.AT_MOST)// wrap_content{mHeight = Math.min(desire, specSize);}}setMeasuredDimension(mWidth, mHeight);//自行设置XML中customImageView的宽高,必须在onMesure()中调用}/*** 绘制*/@Overrideprotected void onDraw(Canvas canvas) {int min = Math.min(mWidth, mHeight);/*** 长度如果不一致,按小的值进行压缩*/mSrc = Bitmap.createScaledBitmap(mSrc, min, min, false);canvas.drawBitmap(createCircleImage(mSrc, min), 0, 0, null);}/*** 根据原图和变长绘制圆形图片** @param source* @param min* @return*/private Bitmap createCircleImage(Bitmap source, int min) {final Paint paint = new Paint();paint.setAntiAlias(true);//抗锯齿//创建一个原图片大小的bitmap,Config.ARGB_8888说明是32位位图Bitmap target = Bitmap.createBitmap(min, min, Config.ARGB_8888);/*** 产生一个同样大小的画布*/Canvas canvas = new Canvas(target);/*** 首先绘制圆形*/canvas.drawCircle(min / 2, min / 2, min / 2, paint);/*** 使用SRC_IN*/paint.setXfermode(new PorterDuffXfermode(PorterDuff.Mode.SRC_IN));//取画布绘制的圆形和图片的交集/*** 绘制图片*/canvas.drawBitmap(source, 0, 0, paint);return target;//返回截出的圆形图片}}
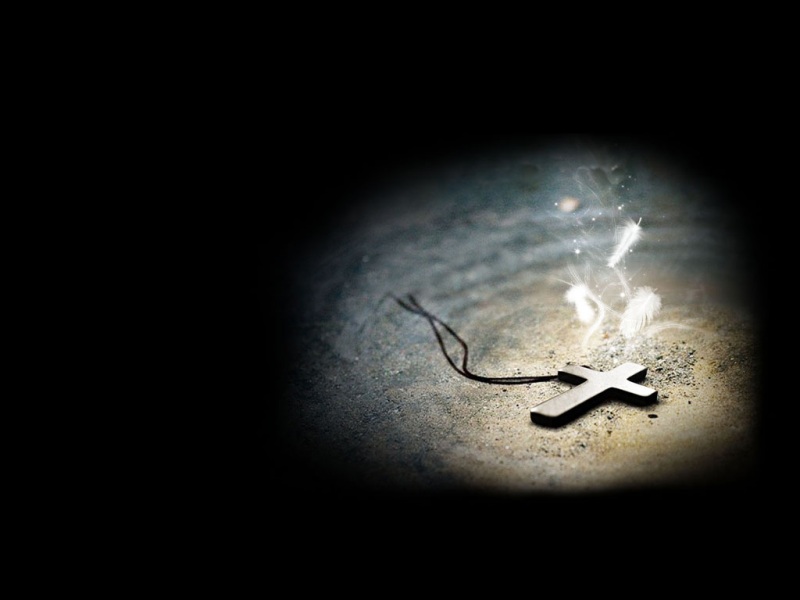
如此,运行后便可以看到圆形图片,下面我的运行结果: 希望大家都能成功切出圆形图片!
本文转载自:/lmj623565791/article/details/24555655