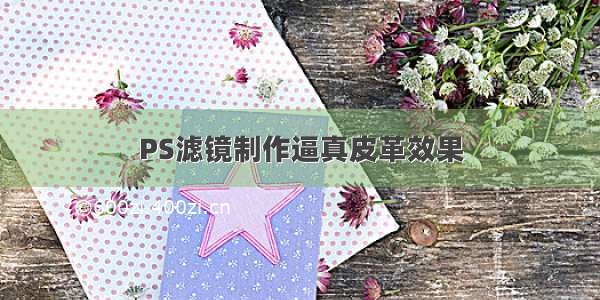
下面请跟着小编一起来了解下PS滤镜制作逼真皮革效果,精心挑选的内容希望大家喜欢,不要忘记点个赞哦!
1PS滤镜制作逼真皮革效果
教程向的朋友们介绍如何利用PS滤镜制作逼真皮革效果,教程是国外翻译的,转发过来分享给大家,教程难度不算大,适合初中级PS学习者学习,我们先来看下最终效果图。
下面是具体的制作过程:
Step 1Create a new file with a white background. Set foreground and background color to black and white by pressing D. Click Filter Texture Stained Glass.第一步:新建一个白色背景的图层,按D设置前景白色与背景黑色,点击滤镜--纹理--染色玻璃
Step 2Create new layer and fill it with white. Change its opacity to 50%. Repeat previous filter by pressing Cmd + F. If you want tweak the setting use Cmd + Alt + F.第二步:再新建一个白色图层,透明度改为50%,CTRL+F重复上次滤镜。如果想修改上次滤镜设置,按ctrl+alt+f.(说明一下,我用的是 PC,所以翻译是按我用的来的。Cmd是苹果机上面的)
2PS滤镜制作逼真皮革效果(2)
Step 3Press Cmd + E to merge both layers. Click Filter Noise Add Noise.第三步:合并这两个图层(ctrl+e),点击滤镜--杂色--添加杂质
Step 4Press Cmd + A then Cmd + C to copy all to clipboard. Open Channels panel and create new channel. Then Paste (Cmd + V).第四步:ctrl+a 全选并复制。打开通道面板新建一个通道。把刚才复制的粘贴上去
Step 5Click RGB channel to return to Background layer. Click Edit Fill, choose Use: Color and pick your color. You can use any color you want, just make sure it’s dark enough for the next filter.第五步:点击RGB通道返回到图层,点击编辑--填充 出现的对话框如下:,然后选择你喜欢的色,但是为了下次滤镜要确保它的暗度()足够。
Step 6Click Filter Render Light Effects. In Texture Channel choose Alpha 1.第六步:滤镜--渲染--光照效果。下面的纹理通选择Alpha 1
Step 7The default light is too dark. You need to add more light sources by dragging the lamp icon to the preview box. Set its type to Omni.第七步:默认灯光太暗了,需要添加更多的光源,将下面灯泡样的图案拖到预览图上。设置全光源。
Step 8Click OK and the result should look something like below.第八步:点击OK。最后的结果应该是看起来有些东西在上面。(纯个人理解)
Step 9Change the background and foreground color to white and black by pressing D then X. Activate the Gradient Tool, choose radial with white to transparent. Create a new layer and draw a gradient.第九步:先D后X,设置前景为白色,背景为黑色。选择渐变工具,由白色到透明的径向。新建一个图层,画一些渐变。
Step 10Change opacity to 4%. This will add subtle lighting to the leather.第十步:将透明度设为%,这是为了给皮革制造少许光。
Step 11The Lighting Effects filter will add a small border to the image (just a few pixels). To remove it, click Image Canvas Size and reduce the size of the image.第十一步:图像边缘也会有少许的光照效果,为了去掉它,单击--图像--画布大小,缩小画布尺寸(健康网温馨提示,下面的相对(Relative) 一字要勾上)
Step 12 (Optional)You can change the color by adding an adjustment layer Hue/Saturation. Check colorize and move sliders until you satisfied with the result.第十二步:可以用色相/饱和度来调色。勾上 着色,移动滑块直到你满意。
Final ImageThat’s it. I hope you like the final result and have learned some new techniques from this short quick tip tutorial.最终效果:当当当。。。就是它了,我希望你喜欢并且从这个教程中学习到一些新的技巧。(嘿嘿。。。确实学到了,这句话也是俺的心声,希望对你们有帮助)